search
Honda Dealers: Please enter the site from the iN or eMall system for dealer specific content and pricing

 Item shown may not be actual product.
Product and price information are subject to change without notice.
Discontinued
Superseded to EEWB582AH
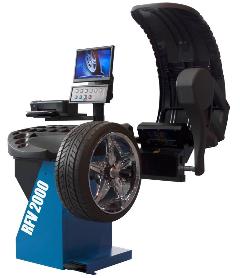
RFV2000 Diagnostic Wheel Balancer, Blue
Item Number: EEWB734BHA
Supplier:
JOHN BEAN
Description
Exclusive laser based 3D profiling provides automatic diagnostic analysis and highly accurate wheel balance results. The RFV2000™ is the only fully automated diagnostic wheel balancer that offers touchless measurement and analysis. Fully automatic inputs remove the chance for error and inaccurate results. When combined with precise wheel balancing, the Runout Force Vectoring (RFV) diagnostics assure uniformity based total ride quality.
Features
- Automatic Power Clamp Mounting
- Electromechanical wheel clamping makes the entire process quick and simple
- Provides a reliable and consistent condition to assure accurate and repeatable measurements
- Automatic Wheel Balance Measurements
- In eight seconds, the color display shows the location of any imbalance and identifies the optimal tape or clip-on weight location
- Automatically measures assembly and rim runout and calculates runout force vectoring for a quick fix match-mounting solution
- Automatic Runout Force Vectoring (RFV)
- A perfectly balanced tire and wheel that is out of uniformity specifications can still cause a vibration complaint. Assembly uniformity is automatically measured before it is balanced. The high and low points of the tire and wheel are displayed with match-mounting and
component contribution solutions. Easy to understand diagnostic messages interpret the assembly uniformity measurements of radial and lateral runout, peak to peak readings, 1st through 3rd harmonic values and calculated radial force variation.- Tire-wheel assembly non-uniformities are determined with accurate runout and calculated radial force variation measurements. Provides smooth rolling match-mounting solutions in an easy to follow guided process.
- Automatic 3D Laser Scan Tire Mapping System
- High resolution camera and laser based topography mapping emulates the same technology used by tire manufacturers in industrial applications.
- Hundreds of thousands of measurement points are taken with a resolution of 0.004" (0.1 mm)
- Tire tread and sidewall color analysis allows depth, wear, and abnormalities to be displayed in a simple to interpret format
- Diagnostic wear pattern analysis automatically suggests vehicle related services such as a wheel alignment and suspension parts check or improper inflation
- 360º tread depth measurements provide cross section tire performance and replacement recommendations
- Tire and wheel measurement data and topography mapped color pictures are easily documented for the customers through color printouts, stored .pdf files, or intranet networking capabilities
- High resolution camera and laser based topography mapping emulates the same technology used by tire manufacturers in industrial applications.
Includes
- EAK0221J94B Honda/Acura OEM Wheel Tooling Kit
- EAK0221J60A Universal 4 Cone Basic Centering Kit
- EAS2081J30AB Storage Cart
- EAA0307G54A Power Clamp Kit
- EAK0221J92A Printer - Color Inkjet Kit
Extended Warranty
The extended RFV2000 John Bean factory warranty applies only to buyers who purchase through the Honda Tool and Equipment Program.
- New equipment will be free from defects in material and workmanship under normal conditions of use for a period of one (1) year from date of installation. Normal wear on consumables are covered for six (6) months.
- Three (3) years on all electronics including: circuit boards, PCs and options installed in the PC, LCD monitors, powers supplies, cameras, lasers, routers, and transducers.
- Field labor is covered under this warranty for a period of one (1) year.
- This warranty does not apply to any product which has been subject to abuse, misuse, alterations, accident, and exposure to the elements, tampering, or failure to provide reasonable and necessary maintenance.
Product Specifications
- Approximate Shipping Weight: 560 lbs.
- Balance Data Entry: Automatic
- Balance Measurement: Round-Off / Binding: 0.25 oz. / 0.3 oz. per plane (programmable)
- Balance Measurement: Units: Ounces, Grams
- Blanace Measurement: Accuracy: 0.05 oz. (1.5 grams)
- Dimensions: 6' x' 6' (182.9 cm x 182.9 cm)
- Display/Format: Color Analysis Topography Mapping
- Measuring Speed: Variable up to 200 r.p.m.
- Power Requirements: 208V - 230V, Single Phase, 50/60 Hx., 10 Amp (maximum draw)
- Runout Measurement: Accuracy: 0.001" +/- 0.002" (0.03 mm +/- 0.05 mm)
- Runout Measurement: Modes: TIre and Wheel Assembly, Rim External with Tire Mounted, Rim Bare at Bead Seats
- Runout Measurement: RFV Repeatability: 1 lb. +/- 2 lbs. force (4.5N +/- 9N force)
- Runout Measurement: Units: Radial and Lateral P-P, R1H, R2H, R3H
- Scanner Accuracy: 0.004" (0.1 mm) per pixel
- Spindle Shaft Diameter: 40 mm
- Tire and Wheel Assembly - Maximum Diameter: 44: (1.117mm)
- Tire and Wheel Assembly - Maximum Weight: 154 lbs. (70kg)
- Tire and Wheel Assembly - Maximum Width: 20" (508 mm)
- Uniformity Measurement: 3D "Sheet of Light", Laser Scanners


